


Drupal 8 | Create custom content type templates Single page template (public and private fields) , Archive page & Archive preview
Create custom content type templates Single page template (public and private fields) , Archive page & Archive preview
Single Page:
First enter in debug mode ( read more about debug mode ), so you can see “File name suggestions” in comments inside your code.
Drupal allows you to create content types for node templates out of the box by following the naming convention node–content-type.html.twig. But things aren’t so simple for page templates.
The difference between a node and a page template.
Page: the template that controls the whole page. This will include a $content variable, which after rendering will be the node.
Node: the template that controls just the content part of the page.
Page template:
To tell Drupal to use the page template for a content type, you can implement hook_theme_suggestions_page_alter(). This hook is used whenever a page.tpl.php template is used and allows you to suggest alternative templates.
In this case, you are going to tell Drupal to use a specific page template for a specific content type, for do that add this code in “.theme” file in you theme.
/**
* Implements bedrupal_suggestions_page_alter().
*/
function bedrupal_theme_suggestions_page_alter(array &$suggestions, array $variables) {
if ($node = \Drupal::routeMatch()->getParameter('node')) {
$suggestions[] = 'page__' . $node->bundle();
}
}
Now you can copy the template page.html.twig and paste in “/template/layout/” folder under your custom template, and rename in “page–customposttypename.html.twig”.
Clear cache, reload single custom post type page, and in “inspect” mode, you can see your new page under
Node teamplate:
Now create a folder “node” under “themes/custom/your_theme/template”, that’ll be the folder that contain all your custom post type template files.
Now copy the file “node.html.twig” from “modules/node/templates/” in folder “node” created before and rename in “node–customposttypename.html.twig”.
This is the file that wrap all content.
For example if you need to add class to the wrapper div :
{%
  set classes = [
    'grid-x',
    'grid-padding-x',
  ]
%}

<article{{ attributes }}>

  {{ title_prefix }}
  {% if not page %}
    <h2{{ title_attributes }}>
      {{ label }}

  {% endif %}
  {{ title_suffix }}

  {% if display_submitted %}
{% endif %} <div{{ content_attributes.addClass(classes) }}> {{ content }}
Clear Cache, reload page and you see the classes added
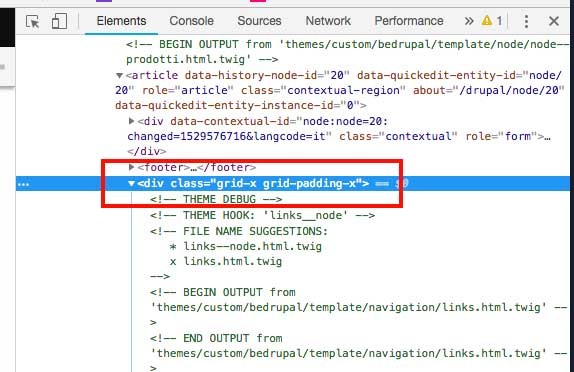
Now we want add class to the div that contain main content text, because we want put a div with text on left and a gallery ( image carousel ) on right.
Copy “field.html.twig” from “themes/custom/your_theme/template/field/” in “modules/node/templates/node” and rename it in “field–node–prodotti.html.twig”.
Now we can wrap ” {{ item.content }} ” with a div and assign classes to it.
We can create a separate template file for every fields that compose our custompost-type.
example:
field–node–field-galleria-prodotto–prodotti.html.twig
field–node–field-prezzo–prodotti.html.twig.
If we need, for example, show field only to registered users ( in my case is price field ), we can add a check on field so if user has permission as administrator or to manage nodes, can view price else view a message with link to login page.
{% if user.hasPermission('administer nodes') %}
    {% for item in items %}
      {{ item.content }}
    {% endfor %}
{% else %}
You must be logged in for see price

{% endif %}
General Archive Page:
For create a Custom Post Type archive, go to “Structure” -> “View” , and “Add new view”, under “view settings” panel in “on type” section, select the Custom Post Type created before, in ” ordered for ” select the order in which you want the posts to appear.
Under ” page settings ” select “Create page”, assign page title, a page slug and save.

Navigate to the page created in the step before, you see the custom post type archive.
You can select which field of custom post type must appears on post preview, under “Format” panel, in “Format” section select the format in which posts appear, in “Show” section, select fields that must appear, ( If click on little arrow that you see on right of “fields” title, and select “rearrange”, you are able to change the order in which fields appear on frontend ).
For example select ” HTML List”, you can add “Row Class”, “Wrapper Class” and “ul / ol” class, save, reload archive-product page and you see the new style for archive page.
If need manage html printed for this view, duplicate ( in my case) views-view-list-html.twig from your_theme_folder/template/view/, (it depends on which “format” you have choose ), and rename in views-view-list–archive-product.html.twig ( archive-product is the view that i have created few steps before ).
Now you can manage html that render the list.
Archive Preview:
As you has do in create ” General Archive page “, go to ” Structure ” -> ” View ” , and ” Add new view “, under ” view settings ” panel in ” on type ” section, select the Custom Post Type created before, in ” ordered for ” select the order in which you want the posts to appear.
Under ” block settings ” select “Create block”, assign block title, and the number of elements that will be showed in the block.
The other settings and options are the same as you had created in ” page archive ” before.
Save, and navigate to ” Structure “-> ” Blocks ” and under ” Regions ” you want the custom post type product appears, click ” Place the block “, select the block just created ( in my case is ” Product preview ” ) and save.
Reload the homepage, and the custom post type preview appears.
One more time, if you need to manage html of this block, duplicate the file views-view.html.twig from your_theme_folder/template/view/ and rename in views-view–product_preview.html.twig ( product_preview is the block that i have created few steps before ).