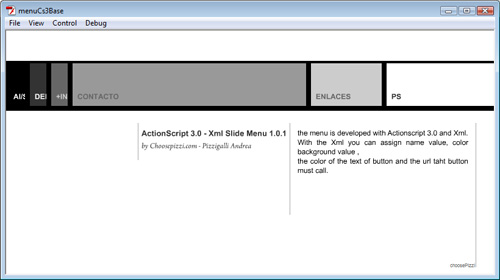
Actionscript 3.0 – Xml Slide Menu 1.0.1
wiev the example – download ITA – download ENG

The menu is developed with Actionscript 3.0 and Xml.
With the Xml you can assign name value, color background value ,
the color of the text of button and the url taht button must call.
How we can do that ?
– First :MAke the Xml file : open an txt editor and copy and past that xml
<?xml version=”1.0″ encoding=”utf-8″?>
<menuSlide>
<itemMenu>
<itemName>AI/SLP</itemName>
<itemDest>txtSection/yourSfw.swf</itemDest>
<itemColor>0x000000</itemColor>
<itemTextColor>0xffffff</itemTextColor>
</itemMenu>
<itemMenu>
<itemName>DERECHOS</itemName>
<itemDest>txtSection/yourSfw.swf</itemDest>
<itemColor>0x333333</itemColor>
<itemTextColor>0xcccccc</itemTextColor>
</itemMenu>
<itemMenu>
<itemName>+INFO</itemName>
<itemDest>txtSection/yourSfw.swf</itemDest>
<itemColor>0x666666</itemColor>
<itemTextColor>0x666666</itemTextColor>
</itemMenu>
<itemMenu>
<itemName>CONTACTO</itemName>
<itemDest>txtSection/txt_Contacto.swf</itemDest>
<itemColor>0x999999</itemColor>
<itemTextColor>0x666666</itemTextColor>
</itemMenu>
<itemMenu>
<itemName>ENLACES</itemName>
<itemDest>txtSection/yourSfw.swf</itemDest>
<itemColor>0xcccccc</itemColor>
<itemTextColor>0x333333</itemTextColor>
</itemMenu>
<itemMenu>
<itemName>PS</itemName>
<itemDest>txtSection/yourSfw.swf</itemDest>
<itemColor>0xffffff</itemColor>
<itemTextColor>0x000000</itemTextColor>
</itemMenu>
</menuSlide>
Save it in a “xml” folder with the name menu.xml
Now start with flash Open you flash editor and open the Actions windows
we start importing the class that we need
import caurina.transitions.*;
we use this class for the tweening motion
now we gone to create the array that we need
var btnArray:Array= new Array();
var arrayTotalBtn:Array = new Array();
var arrayContents:Array = new Array();
and we insert the totalWidth size(is the total size for the menu ) and the maskSize, (mask is the movieClip that must mask the menu )
var totalWidth:Number=750;
var maskWidth:Number;
go to create another couple of var that we use later
var lTxtGallery:Loader = new Loader();
var counterContents:Number=0;
Now we must made the textFormat used for the button title
var formatBold:TextFormat = new TextFormat();
var fontBold:FontArialBold=new FontArialBold();
formatBold.font=fontBold.fontName;
formatBold.color=0xFFFFFF;
formatBold.size=12;
formatBold.bold=true;
and one for the ResultTitle
var formatTitle:TextFormat = new TextFormat();
var titleFont:fontTitle=new fontTitle();
formatTitle.font=titleFont.fontName;
formatTitle.color=0xFFFFFF;
formatTitle.size=18;
formatTitle.bold=true;
we need a movieClip that containing all the menu
var contentTxt:MovieClip=new MovieClip();
contentTxt.x=0;
addChild(contentTxt);
Calculate the total width that is equal at the stage.stageWidth
var stageWidth:Number=stage.stageWidth;
var contMenu:MovieClip=new MovieClip();
contMenu.x=0;
addChild(contMenu);
gone to create one clip that we used for mask
var mcContainerMask:MovieClip=new MovieClip();
with (mcContainerMask) {
graphics.beginFill(0xFFFFFF,1);
graphics.lineStyle(1,0xFFFFFF,100);
graphics.drawRoundRect(0,50,950,330,0);
graphics.endFill();
}
addChild(mcContainerMask);
contMenu.mask=mcContainerMask;
post the counterMovie = 0
var counterMovie:Number=0;
Start Work with XML
load XML file
var buttonsURL:URLRequest=new URLRequest(“xml/menu.xml”);
var xmlLoader:URLLoader=new URLLoader(buttonsURL);
xmlLoader.addEventListener(Event.COMPLETE, xmlLoaded);
var buttonsXML: XML = new XML();
buttonsXML.ignoreWhitespace=true;
function xmlLoaded(evt:Event):void {
buttonsXML=XML(xmlLoader.data);
Create a cicle that determinate how many elements we have in the xml file
for (var numberImage:String in buttonsXML.itemMenu) {
var numberTotalBtn:String=buttonsXML.itemMenu.itemName;
btnArray.push(numberTotalBtn);
}
Insert all elements in a single array
var totalBtn:Number=btnArray.length;
Now we need to know the size of the mask
maskWidth=totalWidth/totalBtn;
start to create the buttons
for (var i:int=0; i<totalBtn; i++) {
trace(“Clip “+i+” has been created “);
var btnClip:MovieClip = new MovieClip();
btnClip.id=i;
btnClip.x=(maskWidth-1)*i;
btnClip.y=50;
btnClip.buttonMode=true;
var mcContainer:MovieClip=new MovieClip();
mcContainer.id=i;
with (mcContainer) {
graphics.beginFill(buttonsXML.itemMenu[i].itemColor,1); // detarminate the colour of the button from the xml file
graphics.lineStyle(8,0×000000,100);
graphics.drawRoundRect(0,0,800,78,0);
graphics.endFill();
}
btnClip.addChild(mcContainer);
Now create the txtField
var txtTitle= new TextField();
btnClip.addChild(txtTitle);
txtTitle.y=50;
txtTitle.x=10;
txtTitle.autoSize=TextFieldAutoSize.LEFT;
txtTitle.embedFonts=true;
txtTitle.multiline=true;
txtTitle.width=maskWidth;
txtTitle.wordWrap=true;
txtTitle.text=buttonsXML.itemMenu[i].itemName;
txtTitle.setTextFormat(formatBold);
formatBold.color=buttonsXML.itemMenu[i].itemTextColor; // detarminate the colour of the button text from the xml file
Insert the buttons in a array
arrayTotalBtn.push(btnClip);
contMenu.addChild(btnClip);
read from the Xml the destination of the button and put it in array
var urlSec:String=buttonsXML.itemMenu[i].itemDest;
arrayContents.push(urlSec);
}
Call the function for made the eventListener for the button
addListenerBtn();
function addListenerBtn():void {
for (var t:int=0; t<arrayTotalBtn.length; t++) {
arrayTotalBtn[t].addEventListener(MouseEvent.CLICK, onClickCateg,false, 0, true);
arrayTotalBtn[t].addEventListener(MouseEvent.MOUSE_OVER, btnOver,false, 0, true);
arrayTotalBtn[t].addEventListener(MouseEvent.MOUSE_OUT, btnOut,false, 0, true);
}
}
}
Create the function for the rollOver state
function btnOver(evt:Event):void {
Assigne at the Clip Object value of the clikked object
var Clip:Object=evt.currentTarget;
trace(“ONOVER”+counterMovie);
Determinate where the button must slide (right or left )
if (counterMovie<Clip.id) {
Create a for cilce for made all btn movied
for (var p:int=0; p<Clip.id; p++) {
Tweener.addTween(arrayTotalBtn[p],{x:((maskWidth-90)*p),time:0.5,transition:”easeInExpo”});//,onComplete:hideAway
Tweener.addTween(arrayTotalBtn[Clip.id],{x:(maskWidth-90)*Clip.id,time:0.5,transition:”easeInExpo”});//,onComplete:hideAway2
counterMovie=Clip.id;
}
}
if (counterMovie>Clip.id) {
for (var r:int=Clip.id+1; r<arrayTotalBtn.length; r++) {
if (arrayTotalBtn[r].x+(180)<800) {
Tweener.addTween(arrayTotalBtn[r],{x:430+(r*40),time:0.5,transition:”easeOutExpo”, onComplete: completeArrayTotal});
function completeArrayTotal():void{
Tweener.removeTweens(arrayTotalBtn[r]);
}
} else {
Tweener.addTween(arrayTotalBtn[r],{x:430+(r*40),time:0.5,transition:”easeOutExpo”, onComplete: completeArrayTotalb});
function completeArrayTotalb():void{
Tweener.removeTweens(arrayTotalBtn[r]);
}
}
}
Uppdate the counterMovie
counterMovie=Clip.id;
}
}
RollOut State
function btnOut(evt:Event):void {
resultTxt.text=””;
}
Click State
function onClickCateg(evt:Event):void {
var Clip:Object=evt.currentTarget;
resultTxt.text= “btn “+Clip.id +” it was clicked”;
}
that’s All Folk’s – Good Luck –
Pizzi
.fla file are commented

