


Magento 2 | Create Ask more info module
I want to understand what is changed in modules development form Magento 1 to Magento 2, so i try to develop a simple module:
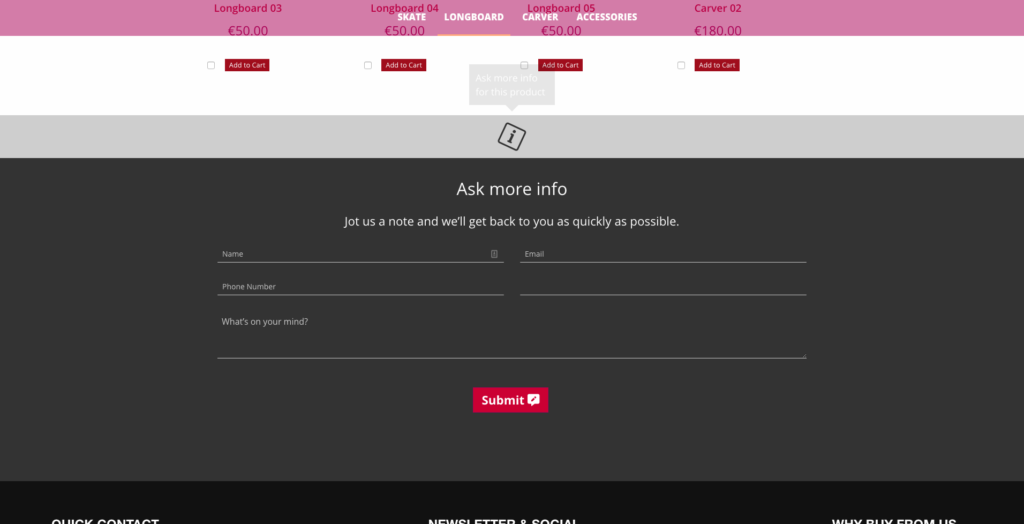
Basically what we want to develop is a contact form in a single product page that we can use for “Ask’s for more info” bout product.
Something like this:
Let’s start by create a module folder under “app/code/vendor-name/module-name”, doing that we need to declare the module by module.xml.
Under the folder we had just created, crate a “etc” configuration folder, ( Magento 2 will use it to recognize the module’s name and version ).
In the “etc” folder create a “module.xml” file and paste in it this code ( remember to change “Beprime_Modulemoreinfo” with “vendor-name_module-name” ):
<?xml version="1.0"?>
<config xmlns:xsi="http://www.w3.org/2001/XMLSchema-instance" xsi:noNamespaceSchemaLocation="../../../../../lib/internal/Magento/Framework/Module/etc/module.xsd">
<module name="Beprime_Modulemoreinfo" setup_version="1.0.1" schema_version="1.0.1">
</module>
</config>
This file contains the following information:
- Module name
- Module version
- Dependencies
Module name is defined by the folders we just created, because in Magento 2, class names must follow the folder structure.
Module version indicates the current version of the database schema and data, and is used in upgrading, every time you implement a new database change, you implement a new version of a module and change the corresponding module.xml. Magento saves the current module’s version in a database, and if the database value and the one in the module.xml do not match, it will execute the upgrade code.
Dependencies. If one module depends on another, the module.xml file will have a declaration that defines a list of modules that the current module depends on.
Now we need to register the module:
For doing that we use a registration.php file.
Let’s create it under the module root folder “app/code/vendor_name/module_name”and add this code ( remember to change “Beprime_Modulemoreinfo” with “vendor-name_module-name” ) :
<?php

\Magento\Framework\Component\ComponentRegistrar::register(
\Magento\Framework\Component\ComponentRegistrar::MODULE,
'Beprime_Modulemoreinfo',
__DIR__
);
The registration.php is a standardized file that follows the same pattern for all modules.
The only thing that varies is the module name.
At this time, we need to Instal Setup and Enable the module, we can do that through command line.
Open your terminal, navigate to your magento directory (cd [magento_directory] )and use this command:
cd [magento_directory]
php bin/magento setup:upgrade
If all it’s right, in the terminal, you’ll see a message like ” Updating modules: ” and below this a list with all modules that be updated, search in it and find “Module ‘vendor-name_module-name’, it means that all it’s right.
Let’s create a route for the module, Magento 2 use this format url:
http://
Example: http://
We need init router name for the module before creating any controllers and actions in the future.
Create a routers.xml file under “modulefolder / etc / frontend / routes.xml” and add this content:
<?xml version="1.0" encoding="UTF-8"?>
<config xmlns:xsi="http://www.w3.org/2001/XMLSchema-instance" xsi:noNamespaceSchemaLocation="../../../../../../lib/internal/Magento/Framework/App/etc/routes.xsd">
    <router id="standard">
        <route id="modulemoreinfo" frontName="modulemoreinfo">
            <module name="Beprime_Modulemoreinfo"/>
        </route>
    </router>
</config>
Remember to change “Beprime_Modulemoreinfo” with “vendor-name_module-name”.
Next step is to create controller and action:
Create an action file in “modulefolder / Controller / Index / index.php” and paste this code :
<?php

namespace Beprime\Modulemoreinfo\Controller\Index;

use Magento\Framework\Controller\ResultFactory;

class Index extends \Magento\Framework\App\Action\Action
{
    /**
     * Index action
     *
     * @return void
     */
    public function execute()
    {
        // 1. POST request : Get request data
        $post = (array) $this->getRequest()->getPost();

        if (!empty($post)) {
            // Retrieve your form data
            $firstname   = $post['name'];
            $email    = $post['email'];
            $phone       = $post['telephone'];
            $subject = $post['subject'];
            $comment = $post['comment'];

            // Doing-something with...

            // Display the succes form validation message
            $this->messageManager->addSuccessMessage('Info request sended !');

            // Redirect to your form page (or anywhere you want...)
            $resultRedirect = $this->resultFactory->create(ResultFactory::TYPE_REDIRECT);
            $resultRedirect->setUrl('/');

            return $resultRedirect;
        }
        // 2. GET request : Render the booking page
        $this->_view->loadLayout();
        $this->_view->renderLayout();
    }
}
Now we need to crete Block, the Block file should contain all the view logic required, it should not contain any kind of html or css.
Block file are supposed to have all application view logic.
Create a file ( i called it ContactForm.php ) under ” modulefolder / Block / ContactForm.php ” and paste this :
<?php

namespace Company\Module\Block;

class Booking extends \Magento\Framework\View\Element\Template
{
    /**
     * Construct
     *
     * @param \Magento\Framework\View\Element\Template\Context $context
     * @param array $data
     */
    public function __construct(
        \Magento\Backend\Block\Template\Context $context,
        array $data = []
    )
    {
        parent::__construct($context, $data);
       }

    /**
     * Get form action URL for POST booking request
     *
     * @return string
     */
    public function getFormAction()
    {
            // companymodule is given in routes.xml
            // controller_name is folder name inside controller folder
            // action is php file name inside above controller_name folder

        return '/Beprime_Modulemoreinfo/index/index';
        // here controller_name is index, action is booking
    }
}
Other thing we have to do is crete the layout and the template for the form.
Crete a “view” folder under the module root and inside this create two folders with two files, “frontend / layout / contact_index_index.xml” and ” frontend / templates / form.php ” and paste those code:
<?xml version="1.0"?>
<page xmlns:xsi="http://www.w3.org/2001/XMLSchema-instance" layout="1column" xsi:noNamespaceSchemaLocation="urn:magento:framework:View/Layout/etc/page_configuration.xsd">
   <body>
      <referenceBlock name="contactForm" remove="true"/>
       <referenceContainer name="content">
           <block class="Magento\Contact\Block\ContactForm" name="customContactForm" template="Beprime_Modulemoreinfo::form.phtml" />
       </referenceContainer>
   </body>
</page>
and form.phtml, the file with the html code.
<?php
/**
 * Copyright © Magento, Inc. All rights reserved.
 * See COPYING.txt for license details.
 */

// @codingStandardsIgnoreFile
/** @var \Magento\Contact\Block\ContactForm $block */
?>

<form class="form contact grid-container"
      action="<?= $block->escapeUrl($block->getFormAction()) ?>"
      id="contact-form"
      method="post"
      data-hasrequired="<?= $block->escapeHtmlAttr(__('* Required Fields')) ?>"
      data-mage-init='{"validation":{}}'>
    <div class="fieldset grid-x grid-margin-x">
        <legend class="legend cell small-12"><span><?= $block->escapeHtml(__('Ask more info')) ?></span></legend>
        <div class="field note no-label cell small-12"><?= $block->escapeHtml(__('Jot us a note and we’ll get back to you as quickly as possible.')) ?></div>
        <div class="field name required cell small-12 medium-6">
            <div class="control">
                <input name="name" id="name" title="<?= $block->escapeHtmlAttr(__('Name')) ?>" placeholder="<?= $block->escapeHtml(__('Name')) ?>" value="<?= $block->escapeHtmlAttr($this->helper('Magento\Contact\Helper\Data')->getPostValue('name') ?: $this->helper('Magento\Contact\Helper\Data')->getUserName()) ?>" class="input-text" type="text" data-validate="{required:true}"/>
            </div>
        </div>
        <div class="field email required cell small-12 medium-6">
            <div class="control">
                <input name="email" id="email" placeholder="<?= $block->escapeHtml(__('Email')) ?>" title="<?= $block->escapeHtmlAttr(__('Email')) ?>" value="<?= $block->escapeHtmlAttr($this->helper('Magento\Contact\Helper\Data')->getPostValue('email') ?: $this->helper('Magento\Contact\Helper\Data')->getUserEmail()) ?>" class="input-text" type="email" data-validate="{required:true, 'validate-email':true}"/>
            </div>
        </div>
        <div class="field telephone cell small-12 medium-6">
            <div class="control">
                <input name="telephone" placeholder="<?= $block->escapeHtml(__('Phone Number')) ?>" id="telephone" title="<?= $block->escapeHtmlAttr(__('Phone Number')) ?>" value="<?= $block->escapeHtmlAttr($this->helper('Magento\Contact\Helper\Data')->getPostValue('telephone')) ?>" class="input-text" type="text" />
            </div>
        </div>
        <div class="field subject required cell small-12 medium-6">
             <div class="control">
                  <input name="subject" placeholder="<?php /* @escapeNotVerified */ echo __('Subject') ?>" id="subject" title="<?php /* @escapeNotVerified */ echo __('Subject') ?>" value="<?php /* @escapeNotVerified */ echo __('More Info About') ?> : <?php echo $this->getUrl('*/*/*', ['_current' => true, '_use_rewrite' => true]); ?> " class="input-text" type="text" data-validate="{required:true}"/>
             </div>
        </div>
        <div class="field comment required cell small-12">
            <div class="control">
                <textarea name="comment" id="comment"  placeholder="<?= $block->escapeHtml(__('What’s on your mind?')) ?>" title="<?= $block->escapeHtmlAttr(__('What’s on your mind?')) ?>" class="input-text" cols="5" rows="3" data-validate="{required:true}"><?= $block->escapeHtml($this->helper('Magento\Contact\Helper\Data')->getPostValue('comment')) ?></textarea>
            </div>
        </div>
        <?= $block->getChildHtml('form.additional.info') ?>
</div>
    <div class="actions-toolbar">
        <div class="primary">
            <input type="hidden" name="hideit" id="hideit" value="" />
            <button type="submit" title="<?= $block->escapeHtmlAttr(__('Submit')) ?>" class="action submit primary">
                <span><?= $block->escapeHtml(__('Submit')) ?> <i class="fas fa-comment-alt-edit"></i></span>
            </button>
        </div>
    </div>
</form>
Last thing is to add our more info form in single product immediately before footer.
Open “app/design/frontend/vendor_name/theme_name/Magento_Catalog/layout/catalog_product_view.xml” and before the closing “