

WordPress | Create custom gutenberg block – Slick Slide
When develop web sites, often happen that we develop some UI / UX element that basically are always the same.
I’ve don’t want develop every time the same UI / UX elements, so I want to have some blocks “ready to use”, i need only add the necessary blocks to my theme, customize a little and they are ready.
So i want develop some blocks that cover this needs.
First of all we need to create a custom category for our custom blocks, so the final user can fast find our new blocks.
Open your theme functions.php and at the bottom add:
 /**
 * Custom block category
 */

function nt_next_block_categories( $categories ) {
  return array_merge(
      $categories,
      array(
          array(
              'slug' => 'ntnext_category', // The slug of our new category
              'title' => __( 'NTNext Custom Blocks', 'ntNext' ), // The name of our new category
              'icon'  => 'welcome-widgets-menus', // an icon choose from the https://developer.wordpress.org/resource/dashicons/#wordpress Dashicon icons
          ),
      )
  );
}
add_filter( 'block_categories', 'nt_next_block_categories', 10, 2 );
Before we can test our new category, we need to create our first block to associated with our custom category.
At the bottom of our theme functions.php add :
// Register a Foundation based simple block
 if( function_exists('acf_register_block') ) {

  $result = acf_register_block(array(
      'name'              => 'nt_slide_block', // Name of our block
      'title'             => __('NTNext - Slider Blocks'), // Title of our block
      'description'       => __('Block made with SLick slider for manage slider and top banner.'), // Description of our block
      'render_callback'   => 'choo_block_render_callback',// Callback function ( the once that contain the template of our block )
      'category'          => 'ntnext_category',// The category in which the block will be inserted
      'icon'              => '<svg version="1.1" id="Layer_1" xmlns="http://www.w3.org/2000/svg" xmlns:xlink="http://www.w3.org/1999/xlink" x="0px" y="0px" width="140px" height="140px" viewBox="0 0 140 140" enable-background="new 0 0 140 140" xml:space="preserve">  <image id="image0" width="140" height="140" x="0" y="0"
      href="data:image/png;base64,iVBORw0KGgoAAAANSUhEUgAAAIwAAACMCAAAAACLqx7iAAAABGdBTUEAALGPC/xhBQAAACBjSFJN
  AAB6JgAAgIQAAPoAAACA6AAAdTAAAOpgAAA6mAAAF3CculE8AAAAAmJLR0QA/4ePzL8AAAAHdElN
  RQfkAR0AFCorB0tFAAAFLElEQVR42u2bW2xURRzGf70svVC6BWyQooEghIIatGBbLCJgFeUSkJBU
  bQSMGIgmokAC0aiRB0kNUXkwogkEGmNQVAxgLQm1yFWqeCElTcVaWgia0tISKF22LZ8PLdBd2Ms5
  u9ttdL6nM//z7ezvzMzOZc8MCosWEQ7FhiWXMMnAGBgDY2AMjIExMAbGwPxXYeL93GseCID77OXU
  oXEhfcudj2eNSKSxev8+t1+f70l2Ubmki+snxgHxOWvrbE/I79/dec3X+NYAWzA/xJVL3wy5bnSs
  cduCcRR19nTWZduA+ft2yjteBRKyZ8+YkAAwy2UDJqlUkg6umjFxcuFHjZJap1uHyYc982Dsp22S
  5NqRBSyxAbNDUnVedyL5bbd0cYxlGCeMhJevF4b7SaDMMswKSWU92kl+q1QRYwMGXusROJ8OT1iF
  GdYq/eHRZgskFdqBmewReR36uS3CfCgpzzNUIh2zA3PEI3IQOGUNJqVV2u0Vy5fko9X464HH5Xok
  s4AGLGluMmz2iu39B2ZZh3nUM5mUAK3WYGZAa4l38BA8aB3mHq90ojUSIAd+cnkHq27OOQiY2yx/
  uZcco+DXm6LnYcSt/f4GyqRQYYbEwmmA+P2TPG4kpFyyWjIJocI4gRaAdZO87gyyXDIhKw64CoyZ
  sM/rzpXeh7kApAHV04PzR3Smdw7IsOCPKMzlc3BvX4HhOEy8aYh+v7x8YzRgDkB6rlcsdsnUqW3R
  gNkFLPOKzUyBvdGA+aUSnvHq+1fA2dJowPAuxG/16DwXToONnT7sfuYz5YFDgSZXMT9K2pl8IzCt
  TTqT4sMd4ZJRYRPMqbg2Zei/pjSRzsWXfLgj2gMDNTO/G8Tdhyq+rWrsf0fO3IFw9cW9Pt2RrSZg
  9FEPZ8Ns39bIL/xP5i4+fj1xvihzt2+rz2pad4VRgUPBSFu3jnt47LBk14WaI/vtLvytyLyJMzAG
  xsAYGANjYAyMgTEw/hSmpUqCM9oP0kM7wjKT7lPVZGAMjIExMAbGwBgYA2NggtPVM30IZu3PIcAk
  Op1O7+0GA5xOp8MeS+naYFy+YMY1tLSc8HwVM6W5paUy1RZLXaHsPUS3XpG0qWcgrV5qz/PhDrA6
  mAof19bW1jb5t/mm2SVpXo/0dkmrsQczvNu23C7M4NNSw41tes9LKiGyML5XlE2F38elb762B2j0
  B3Dm2RCqvSATyLX/+TclLe26dByT3Hm+rYFLJoAjQDVB7D7p0mgAiiStJJowZJyTjsYBj3RKO4k4
  jN8e+OwiyF4Cg4tjqQ/P+y2/8j8clLxH/RewKYP2gubIwwSQ43AuLAvQYOiVNgM44L7LARpM2GAC
  jdrtpH2V1CsNhmCmEMUjYX3vNJiAMCvnAG8M7RMwueugk/TimKByiyxM2ucOfp8P+auDyy6i+lpq
  zWSD5M7x6+uNn/ZySS9AQqVUkxplmAeuSF8CjHdJn0UXxvmXVN91RGSVpOeiCrNd6nio6zKmzO95
  gcj3wC8tgHcOdF1rYTMp2/oRLWW5pEM3Du8USNoQrWpK/VNqGd4jUCxpln2Y4lCq6ZO7YGldz1o7
  BVtsDgsDoM3eJwFYKsnrxMDkDqnMx7AQoGSmwNNBlIyPE11jtnS4qhe0e8Tq48e7hl6quKX/qUy/
  j1Z1mMqapt/27Alyy3RoClAyVd3/F4y3/dMOozK3pQGQ4t8W6e2U3Zr/WNnJjoxs/5XZWzCkzA3C
  9L/8T8/AGBgDY2D6hAyMgTEw4VKYJlf1J8KRy7+6+gGGw00dsQAAACV0RVh0ZGF0ZTpjcmVhdGUA
  MjAyMC0wMS0yOVQwNzoyMDo0Mi0wNzowMK99A10AAAAldEVYdGRhdGU6bW9kaWZ5ADIwMjAtMDEt
  MjlUMDc6MjA6NDItMDc6MDDeILvhAAAAAElFTkSuQmCC" />
  </svg>
  ', // The icon associated with the block ( here i have used a custom SVG )
      //'keywords'        => array(),
  ));

}


function choo_block_render_callback( $block ) {

	// convert name ("acf/testimonial") into path friendly slug ("testimonial")
	$slug = str_replace('acf/', '', $block['name']);
	// include a template part from within the "template-parts/block" folder
	if( file_exists( get_theme_file_path("/partials/blocks/{$slug}.php") ) ) {
		include( get_theme_file_path("/partials/blocks/{$slug}.php") );
	}
}
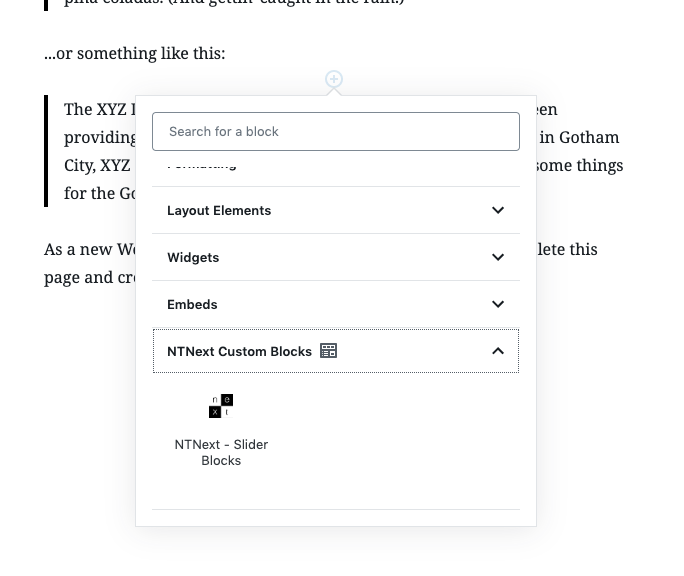
Now we can test if our custom category was fine and if we can call our new block.
If all it’s right, in the blocks list we find our new category.
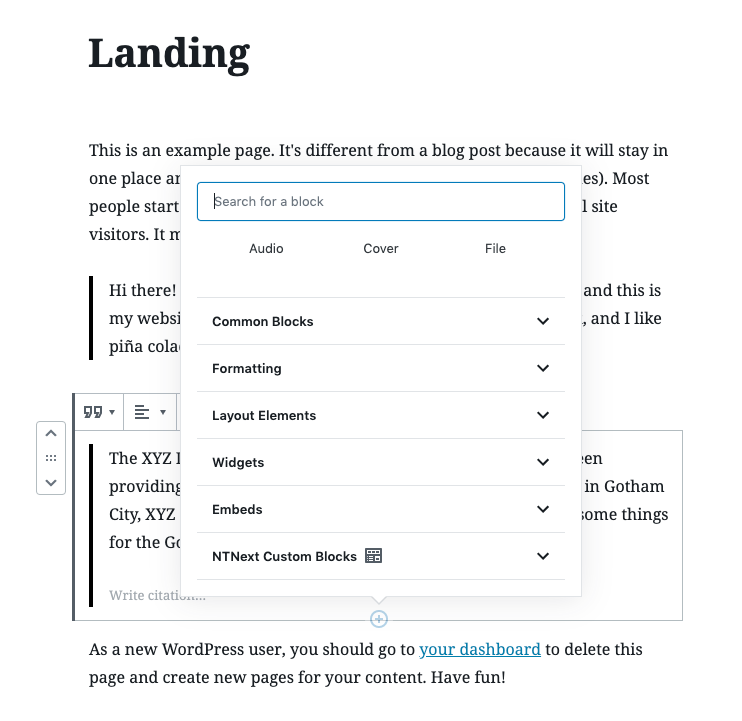
Opening the category we see our custom block with our custom icon.
Now we need to create option and content for the block, for do that we use ACF – Advanced custom field plugin, so download and install it.
Create new folder under your theme and call it “blocks”, inside the folder create new file called as you called the block (function acf_register_block -> title ).php, in my case is “nt-slide-block.php”.
Open the file you have jus created and add:
<?php
/**
 * Block Name: NTnext - Slide Block
 *
 * This is the template that displays the BallerineMie - Testimonial Blocks.
 */

$id = 'ntnext_block-' . $block['id']; // Create an id for every block
?>

/* A basic template */

<section id="<?php echo $id; ?>" class="grid-container block__nt-slide full">
    <div class="grid-container" >
        <div class="grid-x grid-padding-x grid-padding-y grid-margin-x">
        <h2>Slider Blocks</h2>
        <div class="cell block__testimonial_carousel small-12 medium-4">
            Here we are
        </div>
    </div>
</section>
Reload your page, and if all it’s right you see printed ” Slider Blocks Here we are”.

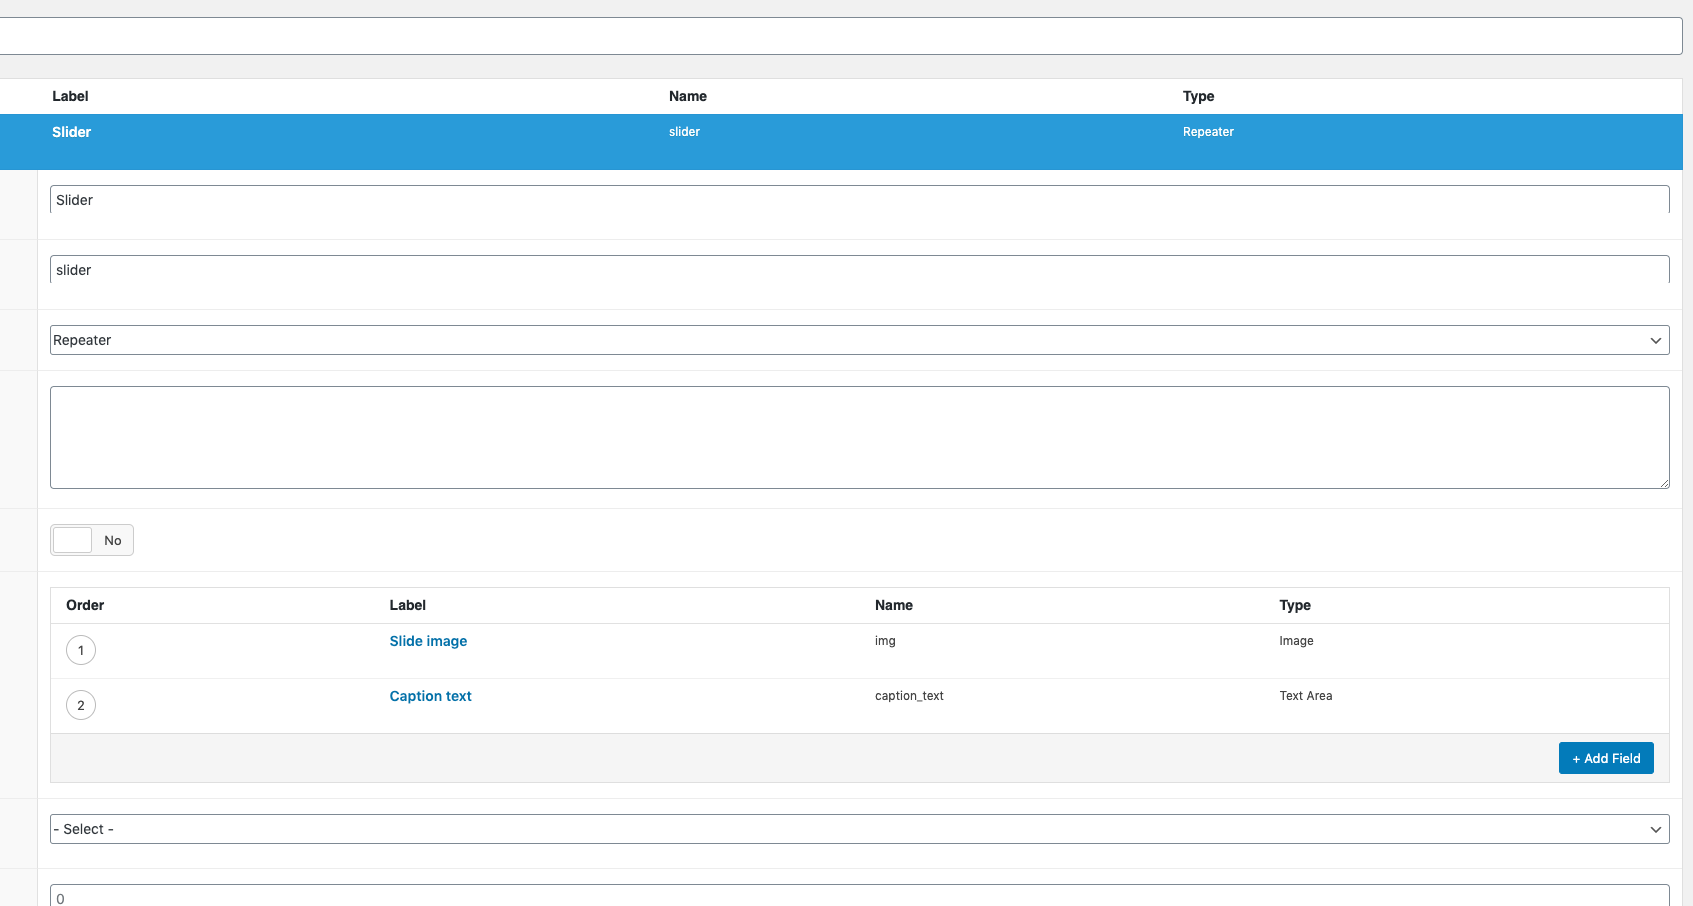
Now we need to add custom fields to the block.
Navigate to ACF admin area and create a repeater Field ( it’s in PRO version of plugin, you can do same using texarea and image field ).
I’ had created a Repeater field, with two fields , a teaxarea for the caption and a image upload for the background image of the slide.
Let’s add the necessary files for Slick Carousel, download the files, and add “slick.mini.js” in the js folder of your theme ( if you don’t have, create it ), and “slick.css” in the css folder ( same as before, if you don’t have, create it ).
In the folder JS, create a blockslider.js file ( at the moment is empty, but will be the place where we put our carousel options ).
Open your function.php and add this code for register js and css files:
<?php if ( ! defined( 'ABSPATH' ) ) exit;
/********************* MAIN STYLES AND JAVASCRIPT FILES ****************/
// Enqueue styles
function ntnext_theme_styles() {
  wp_enqueue_style( 'slick-css',  get_template_directory_uri() .'/css/slick.css' );
  wp_enqueue_style( 'main-css',  get_template_directory_uri() .'/css/default.css' );
}
add_action( 'wp_enqueue_scripts', 'ntnext_theme_styles' );
// Enqueue script
function ntnext_theme_scripts() {
  //jQuery nel frontend versione 3.2.1
  if (!is_admin()) {
    add_action("wp_enqueue_scripts", "my_jquery_enqueue", 11);
    function my_jquery_enqueue() {
       wp_deregister_script('jquery');
       wp_enqueue_script('jquery', "https://code.jquery.com/jquery-3.2.1.min.js", false, null, true);
    }
  }
  wp_enqueue_script('slick_js', get_template_directory_uri() . '/js/slick.min.js', array(), null, true);
  wp_enqueue_script('blockslider_js', get_template_directory_uri() . '/js/blockslider.js', array(), null, true);
}
add_action('wp_enqueue_scripts', 'ntnext_theme_scripts');
Now change the nt-slide-block.php in this way :
<section id="<?php echo $id; ?>" class="grid-container block__nt-slide full">
    <div class="grid-container" >
        <div class="grid-x grid-padding-x grid-padding-y grid-margin-x">
        <?php if ( have_rows('slider') ) : ?>

            <?php while( have_rows('slider') ) : the_row(); ?>

            <div class="cell block__nt-slide small-12 medium-4">

                            <?php
            $image = get_sub_field('img');
            if( !empty( $image ) ): ?>
                <img src="<?php echo esc_url($image['url']); ?>" alt="<?php echo esc_attr($image['alt']); ?>" />
            <?php endif; ?>

            <?php if ( get_sub_field('caption_text') ) : ?>
                    <p class="slide caption"><?php echo get_sub_field('caption_text'); ?></p>
            <?php endif; ?>
            </div>

            <?php endwhile; ?>

        <?php endif; ?>
    </div>
</section>
basically we have added the repeater field ( created before in the ACF admin area ), the relative subfield.
Now it’s the CSS turn:
Open you theme’s .scss file and add this code ( it’s a SCSS code, but with a small effort is possibile to adapt it to CSS ) you can customize it in any way.
.single_block__nt-slide{
    margin-left: .5rem;
    margin-right: .5rem;
    background-color: #333;
    width: 100%;
    height: 500px;
    position: relative;
    overflow: hidden;
    display: block;
    .back_slidee_img{
        width: 100%;
        height: 100%;
        object-fit: cover;
        position: relative;
        left:0px;
        top:0px;
        z-index:1;
    }
    .caption{
        position:absolute;
        z-index:99;
        display:flex;
        width:auto;
        height:100%;
        top:0px;
        font-weight:bold;
        color:#fff;
        text-align:center;
        justify-content:center;
        align-items:center;
        padding:1rem;
        font-family: 'Roboto', sans-serif;
      }
}
Save reload and, if all it’s right, you see something like this:

Back in the page where you add the block and add a second slide:
Now, on front end you see something like this:

Open “blockslider.js” and add:
$( document ).ready(function() {
    console.log( "ready!" );

    $('.block__nt-slide .row').slick({
        infinite: true,
        slidesToShow: 1,
        slidesToScroll: 1
      });
});
save, reload the page, and see your slider in action!!